Ingredients:
- 1 Unity project w/ the Marrow ExtSDK setup
- 2 braincells
- M&M / Skittles
The Marrow ExtSDK is not official, but is used in almost all of the mods, since it provides a lot more stuff than the official sdk.The extsdk has all of the in-game scripts - it lets us use them.
This is not a unity tutorial, you can look up one if you want to. In this tutorial we’ll be going through some useful scripts, and we’ll be making a few spawnables. I’ll provide screenshots and prefabs when needed.
If you’re having trouble understanding something, feel free to message me on discord - bugobug.
Please make sure to watch this video before continuing the tutorial, although the video shows how to make an avatar, it’s still good practice and will help you get to know the sdk.
In this part we’ll be making a simple cube with a grip that you can throw around.
First off, make a new prefab or add an empty object in your scene.Now, add a cube under it. That would be the mesh/collider of your spawnable. You can add something else that's not a cube, up to you.
Now, add a rigidbody to your root object (root = the object above all of the other objects).You also want to add an interactable host. That’ll let the game know that's the root of your spawnables, and will make it so you can use grips and interact with it.
Now for the grips. I’d suggest getting these presets by SoulWithMae. Although these are great examples, you should further tweak them and modify them to your needs. Everything on the grips is pretty much self explanatory.If you want to make it so you can force pull the grip, you’d want to add a force pull grip script, and an interactable icon. Make sure these are on the same object as your grip. Here’s a simple setup of them: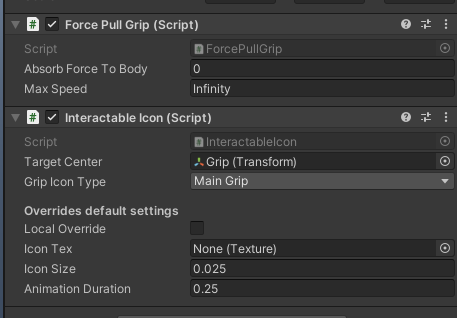
Your spawnable is now ready! If you have it in your scene, drag it into your assets to make it a prefab. Make a new pallet, and add the prefab as a spawnable crate and pack your mod to the appropriate platforms. And you’re done! You’ve made your first spawnable. Test it out in game!
No one wants a cube that doesn’t do anything, right? In this part we’ll be making the grip detach when your press the trigger, and “jump”.
Make a new gameobject, and add Simple Grip Events to it, you’ll see that it has a lot of UnityEvents. You can add an event using the plus/minus button and it’ll get executed accordingl. You can’t do much with UnityEvents, and that’s where UltEvents come in. UltEvents are glorified UnityEvents, that let you run methods, and change properties.
At the bottom of your Simple Grip Events (Will be referred to as SGE), you can see a list of grips. You want to add your grip to the list. Now, add a script called Ult Event Holder to the same object. This can be executed whenever you want to. You can see a plus button on the top right, that’s how you add an event. After you added an event, drag in your grip object on the left of the event, and select the grip. From there, go to Base Types at the bottom, and go to SLZ.Interation.Grip.
Now for the grips. I’d suggest getting these presets by SoulWithMae. Although these are great examples, you should further tweak them and modify them to your needs. Everything on the grips is pretty much self explanatory.If you want to make it so you can force pull the grip, you’d want to add a force pull grip script, and an interactable icon. Make sure these are on the same object as your grip. Here’s a simple setup of them:
Your spawnable is now ready! If you have it in your scene, drag it into your assets to make it a prefab. Make a new pallet, and add the prefab as a spawnable crate and pack your mod to the appropriate platforms. And you’re done! You’ve made your first spawnable. Test it out in game!
In this part, I’ll be explaning how to make a custom avatar dice. This will get you more familiar with the scripts in the sdk, and how to use them. It’ll also help you learn about the pallet system.
Before we start, it is really important that you take a look at SLZ’s GameObject workflow guide. This will teach you how to organize your spawnables structure. Make sure you add an interactable host to your root/object with the rigidbody.
Make a new gameobject, this will be your root - set it up according to the guide.
Add a new component to your root called “Dice”. This is the part of the avatar dice that determines what side it lands on.
Add 2 new objects to the dice, call one of them “Up”, and the other one “Right”. Rotate the Up object -90 degrees on the X axis. This will make its Z direction face upwards.
Now, rotate the right object 90 degrees on the Y axis. This will make its Z direction face to.. you guessed it, to the right.
After that’s done, we can get to the script setup.
On the dice script, you want to add 3 elements to the sides list.
This is how you would want to set them up: Make sure you reference the rb/interactable host accordingly.
Now, let’s setup the avatar dice script
This should be fairly simple. Reference the dice script up top, and add 6 elements to the avatars list. These would be the references to the avatar crates. You can either throw in the barcode to the crate (Barcode is basically the string that “describes” the crate. For modded crates it would be Author.PalletName.Crate). You’re done! Now you can add your mesh, and grips!
You can download the Avatar Dice prefab here. It won’t have the mesh. Also keep in mind it has a lot of other scripts that I haven’t talked about, these are just scripts for better visualization.
You’d also need SoulWithMae’s ripped surface datas.
Before we start, it is really important that you take a look at SLZ’s GameObject workflow guide. This will teach you how to organize your spawnables structure. Make sure you add an interactable host to your root/object with the rigidbody.
Make a new gameobject, this will be your root - set it up according to the guide.
Add a new component to your root called “Dice”. This is the part of the avatar dice that determines what side it lands on.
Add 2 new objects to the dice, call one of them “Up”, and the other one “Right”. Rotate the Up object -90 degrees on the X axis. This will make its Z direction face upwards.
Now, rotate the right object 90 degrees on the Y axis. This will make its Z direction face to.. you guessed it, to the right.
After that’s done, we can get to the script setup.
On the dice script, you want to add 3 elements to the sides list.
This is how you would want to set them up:
Make sure you reference the rb/interactable host accordingly.Now, let’s setup the avatar dice script
This should be fairly simple. Reference the dice script up top, and add 6 elements to the avatars list. These would be the references to the avatar crates. You can either throw in the barcode to the crate (Barcode is basically the string that “describes” the crate. For modded crates it would be Author.PalletName.Crate). You’re done! Now you can add your mesh, and grips!
You can download the Avatar Dice prefab here. It won’t have the mesh. Also keep in mind it has a lot of other scripts that I haven’t talked about, these are just scripts for better visualization.
You’d also need SoulWithMae’s ripped surface datas.